Monday, August 22, 2011

It's Time To Make the Coffee!

Mommy scored a job at Starbucks this week! This job is perfect for me, and the family. The hours are early morning, so I'll be here when the children walk home from school.
Perks:
  • Free drinks during my shift...and free drinks for the man when I leave
  • One free pound of coffee each week...that saves us $7 a week right there
  • 30% off purchased items...so family and friends, expect Starbucks related items for Christmas
  • I get to make some srsly delicious lattes!
The best part about this new endeavor is that I'll be home for the kids, no daycare needed, and I can attend all of the important school functions and baseball games.

Give me a month to perfect my skills and then come see me please! Wish me luck friends!

Daddy's Duties

There is nothing sweeter than a grown man jumping up in the middle of the night because his daughter has just fallen out of bed. Extra sweet because I'm not the one that had to do it. He tucked her back in, kissed her, and said good night and she went right back to sleep. Now if only he'd do the 3am barf calls...usually I get a tap on the shoulder and, "Jamie....Toby just barfed."

Saturday, August 6, 2011

Let's all give a cold-blooded welcome to...


...Professor Snake

 Professor Snake is a python regius, more commonly known as a ball python. Our new male family member currently lays a good two and a half feet long, but he should grow another foot over time. We acquired him through our dear friend, Angie. This is one of the most docile, slow, and curious reptiles I have ever had the pleasure of allowing to slither up my arm.

The idea to own a snake was Alex's. He said, "But Mom....you wuv weptiles!" My response wasn't overly excited, and to be honest, I had no intention of making this acquisition so soon. First, we did our homework.
  • Ball Pythons are native to Africa, and prefer grasslands, savannas, and wooded areas
  • They are egg layers, compared to their sister snake, the boa, who gives birth to live young
  • When stressed or frightened, the ball python will curl itself into a ball...hence the name
  • This is the most commonly traded snake among reptile owners. Because of the demand, the supply comes most often from captive bred parents, and has resulted in less interest in importing specimens from the African wild. This is a good thing. Captive bred adults are docile, tame, and rarely bite.
  • Small mammals such as mice and rats are the prey of choice, although in the African wild they favor gerbils. (I still love my gerbils)
  • Ball pythons are a non-venomous species of snake. This is not to say he is incapable of biting; however, his tiny, needle-like teeth are primarily meant for hanging on to prey, and not injuring it. Professor Snake does not have fangs...I know, I watched him yawn.
  • Males grow between three and half and four feet in length, while their female counterparts can expand to six feet in length. We adopted a male.
The myth that pythons are dangerous to families with small children is typically born from misinformation. Sadly, larger python species (Burmese, African Rock) who were kept in poorly contained enclosures and not properly respected have been involved in senseless tragedies. It should be noted very carefully though that the most recent incident in St. Petersburg, Fl involved an eight foot six inch Burmese python that was kept in a large tank with no lid. He was placed in a holey bag, and a quilt was laid over the top of his home. Key factors here are the size of the snake, the species, and the neglect of respect for its housing needs. We do not, and never will, own a child-killing snake.
    I would like to suggest some reading for anyone with lingering doubts about our decision to allow a captive bred ball python a place in our home:
    UCGS Herpetology FAQ's
    Green Iguana Society - Better Pets for Kids
    3 Reasons Ball Pythons Make Great Pet Snakes
    So Your Kid Wants a Pet Ball Python
    And lastly, this is the article regarding the St. Petersburg, Fl Burmese python incident. It is not for the faint of heart, and truly a tragedy all around. I only place it here so that family and friends who see this story as a comparable example to our new pet can make note of the facts for themselves.
    Officials Capture 9 foot Burmese Python
    The media has brought well deserved attention to the growing problem of reptiles being released into the "wild" once they become too large for their adoptive family. Professor Snake is already in a size sufficient terrarium (locked and secured as required by Florida law), and shouldn't need additional extra feedings or larger housing. However; please rest assured that in the instance he requires re-homing, we will not be granting him freedom in the Florida Everglades. It should be noted here that the problem is mostly attributed to the Burmese and African Rock species and not the ball python. Stopping a Burmese Python Invasion

    Professor Snake loves to feel the warmth of the boys' bodies. He rests gently around our shoulders, or winds his way delicately up and down our arms. We can safely touch his head and tail (although it isn't exactly enjoyable for the snake, so we choose to avoid those sensitive spots), and are able to handle him frequently. His posture remains relaxed at all times.
    We fed PS for the first time yesterday, and I'm pleased to report that it was a success! Pythons have the potential to be picky eaters, but we have a hungry fella in our possession. Savory medium sized rats are his food of choice...he isn't fond of human fingers, and hands.
    Thanks for taking the time to read through the articles and learn about our particular specimen of ball python. We are very optimistic about the enjoyment and education he will bring to our budding ophiophiles...aka snake lovers.

    - Jamie

    Friday, May 27, 2011

    My heartbeats.

    No matter what age, the boys and the girl love to hear the stories of the moment they were born. They are all completely at ease with that part of our life cycle. I'm assuming it's because there are so many of them, that they each have a memory of a sibling being born. Except Brooklyn of course, but she has experienced close friends having babies.

    This is the first time Alex has really been intrigued by the details of his "marching day", as he calls his March birthday.

    He asked, "What was the first thing I did when I came out? Did I relax? Did you put a diaper on me? Did I get a bath?"

    I said, "No, you laid on my chest and looked at me while I looked at you." I proceeded to explain the process of breastfeeding a newborn baby and the special ingredients that are passed from mommy to baby to prevent them from getting sick. I told him how he loved to be swaddled by his father and then held tightly next to my heart.

    He said, "Mom, does your heart sound like this?" He kicked his feet in a rhythm against the couch.

    And then Alex started to cry very soft, quiet tears. I asked him why he was crying, and he said, "I don't know. I guess I remember being a baby and being happy to hear your heart."

    What a sweet kid. He can by my favorite today.

    Tuesday, May 24, 2011

    It's Alive!!!

    Filling five ravenous children's bellies is a challenge. They have needs, favorites and requests, and being a stay at home mom I have the time to oblige. Yogurt makes the top 5 "I want" list. I used to buy the 10/$5 yogurt deal only to be completely yogurt free within 2 days. That is until one glorious day when Google search led me to a crock pot website with a homemade yogurt recipe....

    The recipe:

    Crock Pot Yogurt

    • 8 cups (or a half gallon) of milk. I use 2%, whole will work fine, but I wouldn't go with skim
    • 1/2 cup store bought yogurt with the living stuff...once you make your own, you can use a 1/2 cup of that as a starter for the next batch. 
    • a crock pot
    • heavy towel
    I have done this both over night, and during the day. The results are the same either way. First, fill your crock pot with the milk and turn on high for 2 hours and 30 minutes. 
    Next, unplug the crock pot and turn it off to let the milk cool for 3 hours. Once the time is up, your warm milk will be the perfect temperature to host the live cultures in your yogurt. 
    Add the 1/2 cup of store bought or your previous homemade yogurt to the crock pot milk and stir thoroughly. I have used flavored yogurt, but I really didn't notice a difference in the final product. It's better to mix fruit in per serving once it's done. 
    Wrap your heavy towel around the crock pot for insulation purposes and leave it alone for 8 hours or overnight. Yesterday, I started my yogurt around noon and left it completely overnight wrapped in it's towel until morning. It turned out delicious.
    In the morning...this is what I found:
     And this is how I served it:
     Homemade yogurt with granola and honey

     Yogurt tips and tricks: stir fresh fruit or jelly or honey or syrup into each serving, freeze in ice cube trays to make a quick popsicle, use frozen cubes in the blender with fruit to make a smoothie, try it as a recipe substitution, strain it overnight through cheesecloth to make Greek style yogurt, add powdered milk for extra vitamin  D, add unflavored gelatin (2T) to the batch to make it a little thicker.

    Dr. Mom tip: Our pediatrician recommends feeding Activia yogurt to the family when a housemate is barfing. We have since evolved to giving the frozen ice cube tray homemade yogurt as a popsicle to the barfer, and the healthy people eat a serving in the morning and again at night. The theory is that the live cultures nestled in the yogurt attack the viral culprits in the intestines. The result is a speedier recovery for the barfer, and no barfs at all for the healthy ones. I will swear by this suggestion until the day I die. Coming from a mom who has cleaned up more barf than I care to discuss, keep this tip in the back of your head next time you hear that horrible middle of the night call, "Mooooooooom....I barfed."

    The best part about this project is telling your kids they are eating live organisms. I've never had it so quiet around my dinner table, with each child wondering suspiciously to themselves just what mommy was feeding them. Then one will look at the other and wonder how ridiculous they would sound if they told him he just felt the organisms move. It's great.

    Monday, May 23, 2011

    Tonight's menu: Spinach & Artichoke Ravioli, Garlic Oregano Bread, and Strawberry Turnovers

    My previous attempts at homemade ravioli were disastrous. Imagine rock hard pasta coming apart at the seams, filling seeping out and water flooding in. Every fork pierce was like a mini levee breaking. Bummer dude...

    Today I had the time and most importantly the desire to have a ravioli retry. They turned out AMAZING. I got 5 stars from Jake, two thumbs up from Toby, a mumbled "mmmmaaahk uuuu" from Alex, and a sloppy spaghetti kiss from the girl child.

    The Recipes:

    Dough Ingredients

    • 2 cups all-purpose flour, plus more for dusting
    • 1 teaspoon salt
    • 3 large eggs
    • 2 tablespoons oil

    Filling Ingredients

    • Half a box of frozen spinach; thawed and squeezed out
    • Half a can of artichoke hearts
    • about a cup of shredded mozzarella cheese
    • about a quarter cup of Parmesan cheese
    • Saute 2 cloves of garlic
    • salt and pepper to taste
    • spoonful of sour cream
    • spoonful of mayonaise
    • (I froze the remaining halves of spinach and artichokes, but you could also double your dough and filling to freeze leftover raviolis...freeze them uncooked.)

    Directions

    To make the pasta dough: In an electric mixer fitted with a dough hook, combine the flour and salt. Add the eggs, 1 at a time, and continue to mix. Drizzle in 1 tablespoons of the oil and continue to incorporate all the flour until it forms a ball. Use mixer to continue to knead the dough for 10 minutes, stopping occasionally to gather the dough into a ball with your hands. Brush the surface with the remaining olive oil and wrap the dough in plastic wrap; let rest for about 30 minutes to allow the gluten to relax.

    After 30 minutes, separate the dough in half, reserving the remaining half in plastic wrap until use. Ideally, a pasta machine would be great here, but I greased up my elbows it did it the old fashioned way. You really need to roll these out as thinly as possible. 1/8inch is your target thickness, but do the best you can. Strive to see your hand through the dough, and it should be fine.
    I used a 3 inch round cookie cutter to make the ravioli shape. Place the cutter on the dough and drop approximately 1 heaping T of filling into the center; however, DO NOT PRESS DOWN YET. Rather just move the cookie cutter over and continue to use it as a guide.

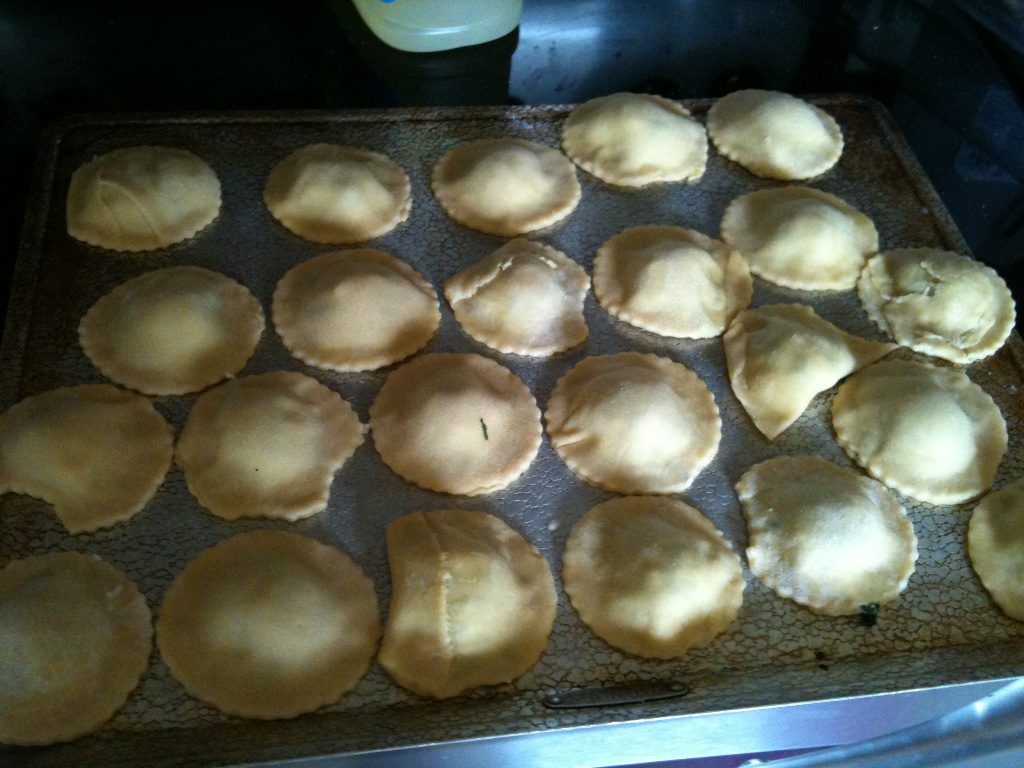
    I was able to get about 18 raviolis off of one roll out. Roll out the second dough and prepare to lay it over the top. First, use fingertips dipped in water or an egg wash to moisten the dough around the filling to help seal (key reason I didn't have water logged raviolis). Lay the top dough over the bottom and press around the filling to remove air bubbles, seal tightly about a half inch out from the filling. Use your cookie cutter to finally cut out the raviolis. Pick them up and lovingly seal the edges once again, taking time to make sure the air bubbles are out and thin out the dough surrounding the filling. Re-roll any leftover scraps to make a full 24 raviolis.


    This is a secret tip from me to you: let your raviolis dry out. Leave them on the counter for an hour or two making them seem stale and displeasing; however, you will be rewarded with firm, moist, non-water filled raviolis. I promise!

    Boil a pot of water and slide raviolis in about 5 at a time, cooking for 2-3 minutes or until they've been allowed to float for a bit. Drain onto a plate and then simmer in sauce.

    We served with homemade garlic bread, and strawberry cream cheese turnovers.

    PS. I make the best garlic bread in the world...I learned it from the man. He's a fabulous cook. To mimic his skillz like I did...take 1 stick of butter and allow to soften all afternoon. Mince 4-5 garlic cloves and sprinkle with kosher salt. The salt removes the moisture from the garlic, allowing you to scrape the flat side of your knife over the top of the minced garlic and create a paste. Patience is key here...keep going until you have no chunky garlic pieces left. Mix this paste in with the butter and add some oregano, basil if you have it. I use dried, but fresh works wonderfully as well. Cut your loaf of french bread in half length wise and spread half of the butter mixture onto each side. Bake it closed up for 15 minutes, open it up, add cheese if you like and bake another 10 minutes...keeping a close eye on it.

    It's a very budget friendly meal as well. I had sour cream, mayonnaise, and Parmesan cheese on hand, but nothing else. It cost me $12 to buy everything I needed to make dinner, side, and my dessert.

    Think of me while you're stuffing your face!

    Jamie

    Monday, May 2, 2011

    The Oil Cleansing Method

    Thanks to my friend, Kim, for the link that lead me to trying this skin cleanser.

    I'm big on natural and homemade products...for cleaning, eating, washing, you name it and I can pronounce it, I'll try it. Not only does it benefit our bodies, but also my bank account. You can't beat the $2 laundry soap that lasts for weeks, or the readily available dusting polish that costs pennies to whip up.

    My homemade soaps are oil based, and you really can't beat the feeling of your skin after a natural olive and palm oil lather. I have high hopes for the liquid version for my face.

    I don't wear much makeup, except for mascara and occasionally some eye shadow, and my skin is generally very healthy. However, I live in the most beautiful sunshine state, and it has the potential to reek havoc on a lady's most displayed organ. I also have two children who will likely suffer from problem skin, and one with frequent styes in his eyes. My goal is to test this on me for a week, and then introduce my boys to the cleanser as well.

    Some excepts from an OCM website:

    "These products [over the counter cleansers] strip the oil out of our skin, leaving our largest organ trying to repair itself by replacing the oil stripped away. This leaves us in a cycle of being tight and dry followed by the inevitable oil slick. Each time we strip the oil away, our skin over-compensates for the lack of moisture by creating more oil."

    "Getting right down to basics, when cleansing and moisturizing your skin, it is imperative that you keep in mind that oil dissolves oil. Your skin naturally lubricates itself with oil, and as we are creatures of adaptation, one can believe that if this weren't the appropriate built-in care for ourselves, our bodies would have adapted to suit the need."


    (Taken from http://www.theoilcleansingmethod.com)

    The Oil Cleansing Method

    First and foremost, this is typically done in the evening, prior to bed. There should be no need for deep cleansing in the morning if you're waking up with skin cleansed the night before. In the morning, a quick wipe with a warm washcloth should suffice. We don't want to overcleanse our skin as this will serve only to irritate and cause more oil production. The objective of using this method is to deep clean while balancing our skins oil production at the same time.
    • You'll need a soft washcloth, your oil blend, and hot, running water.
    • Pour a generous puddle of oil into the palm of your hand. Roughly, the size of a quarter, but more is acceptable. Rub your hands together to warm the oil and smooth over your face.
    • Begin massaging the oil into your face. This will remove makeup, dirt, and other impurities, so there is no need to use a makeup remover or wash your face prior to the massage. I've found that this removes even my stubborn waterproof mascara and concealer.
    • Using slow, firm motions across the skin, massage the oil deeply into your pores. Take your time and focus on your problem areas. You want the oil to work into your pores so that blackheads and the like can be dissolved and steamed away.
    • As you're massaging, let your mind drift off to something calming and breathe deeply. Take this time to relax and release some of the stress that your body is harboring. Sit down, breathe deeply, and take your time. Give the oil enough time to work on dissolving the impurities in your pores and give yourself enough time to unwind. Picture what your face would look like if it were completely clear and free from blemishes. Focus on that image and know that it is attainable. Trust that it is attainable. Accept that it is attainable. You can have clear skin, free of blemishes and you will have clear skin, free of blemishes. Focus on perfect skin and breathe deeply.
    • Once you're satisfied that your pores are saturated and you're feeling calm, pick up your washcloth and soak it in clean, steamy water. We want the water to be warm enough to open your pores and remove the oil. Cool water will not open your pores, nor will it remove the oil efficiently. We're not scalding our skin, we're steaming to coax our pores to release the oil carrying the impurities. We're essentially steaming our skin as an esthetician would, but without the luxury of a steam machine.
    • Hold the washcloth to cover your face. Allow it to stay until it cools. You will feel your pores releasing the impurities. Wipe the oil gently away and rinse the washcloth well in hot, running water. Hold the washcloth to your face again, allowing it to cool. Wipe gently, rinse well, and repeat two or three more times. Avoid any temptation to scrub, as you'll find it's completely unnecessary and your skin will be soft, smooth, and free of flakes without the additional manual exfoliation and irritation that will result. Impurities, dead skin cells, and bacteria will be gently swept away.
    • Have no fear of the oil, as the steamy washcloth will remove it. The Castor Oil, though it is an oil, will help with the removal of the other oils, as well. It is our main cleansing oil and is easily removed with warm water.
    • If your skin feels tight, take a tiny drop of your oil blend, rub it between your clean, damp palms and pat it onto your damp skin. Gently massage any oil residue into your skin so there is no film of oil left sitting on the surface. Your skin should now glow!

    The Recipe:
    This is the latest concoction that has made it's way into my bathroom
    - 2 T castor oil (found it at Publix for $2.50 for a 6 ounce bottle)
    - 8 T olive oil (the less virginal the better)
    - 1/4 t tea tree oil for it's natural anti-bacterial qualities. (increase this amount if your skin is prone to break outs...decrease or eliminate if you have exceptionally dry skin)
    - 1/2 t jojoba oil (no problem, if you don't have this. I use it in my soap making for the moisturizing qualities, and to keep me minimally wrinkly)

    Make sure you massage it into your lips and eyelids as well.

    Wishing you glowing, smooth skin friends!